On the Cluster Nodes, the hardware driver and additional kernel modules, user space libraries and the Node Manager will be installed. On the Cluster Management Node, the Network Manager and the cluster administration tool will be installed.
An additional package for SISCI development (SISCI-devel) will be created for both, Cluster Management Node and Cluster Nodes, but will not be installed. It can be installed as needed in case SISCI-based applications or libraries (like NMPI) need to be compiled from source.
The integrated cluster and Cluster Management Node installation is the default operation of SIA, but can be specified explicitly with the --install-all option. It works as follows:
The SIA is executed on the installation machine with root permissions. The installation machine is typically the machine to serve as Cluster Management Node, but can be any other machine if necessary (see Section 1.2.2.1, “No X / GUI on Cluster Management Node”). The SIA controls the building, installation and test operations on the remote Cluster Nodes via ssh. Therefore, password-less ssh to all remote Cluster Nodes is required.
If password-less ssh access is not set up between the installation machine, Cluster Management Node and Cluster Nodes, SIA offers to set this up during the installation. The root passwords for all machines are required for this.
The binary packages for the Cluster Nodes and the Cluster Management Node are built on the kernel build machine and the Cluster Management Node, respectively. The kernel build machine needs to have the kernel headers and configuration installed, while the Cluster Management Node and the installation machine only compile user-space applications.
The Cluster Node packages with the kernel modules are installed on all Cluster Nodes, the kernel modules are loaded and the Cluster Node manager is started. At this stage, the interconnect is not yet configured.
On an initial installation, the dis_netconfig is installed and executed on the installation machine to create the cluster configuration files. This requires user interaction.
The cluster configuration files are transferred to the Cluster Management Node, and the Network Manager is installed and started on the Cluster Management Node. It will in turn configure all Cluster Nodes according to the configuration files. The cluster is now ready to utilize the PCI Express interconnect.
A number of tests are executed to verify that the cluster is functional and to get basic performance numbers.
For other operation modes, such to install specific components on the local machine, please refer to Appendix A, Self-Installing Archive (SIA) Reference.
Log into the chosen installation machine, become root and make sure that the SIA file is stored in a directory with write access (/tmp is fine). Execute the script:
# sh Dolphin_eXpressWare_<version>.sh
The script will ask questions to retrieve information for the installation. You will notice that all questions are Yes/no questions, and that the default answer is marked by a capital letter, which can be chosen by just pressing Enter. A typical installation looks like this:
[root@scimple tmp]# sh ./Dolphin_eXpressWare-Linux_x86-PX-v5_5_0_2018_Jan_20.sh
Verifying archive integrity... All good.
Uncompressing Dolphin DIS 5.5.0
#* Logfile is /tmp/DIS_install.log_140 on tiger-0

#*
#+ Dolphin ICS - Software installation (version: 1.52 $ of: 2015/06/30 16:31:32 $)
#+

#* Installing a full cluster (Cluster Nodes and Cluster Management Node) .

#* This script will install Dolphin PCI Express drivers, tools and services
#+ on all Cluster Nodes of the cluster and on the Cluster Management Node.
#+
#+ All available options of this script are shown with option '--help'

# >>> OK to proceed with cluster installation? [Y/n]y

# >>> Will the local machine <tiger-0> serve as Cluster Management Node? [Y/n]y
The default choice is to use the local machine as Cluster Management Node. If you answer n, the installer will ask you for the hostname of the designated Cluster Management Node machine. Each cluster needs its own Cluster Management Node machine.
Please note that the complete installation is logged to a file which is shown at the very top (here: /tmp/DIS_install.log_140). In case of installation problems, this file is very useful to Dolphin support.
#* NOTE: Cluster configuration files can be specified now, or be generated
#+ ..... during the installation.
# >>> Do you have a 'dishosts.conf' file that you want to use for installation? [y/N]n
Because this is the initial installation, no installed configuration files could be found. If you have prepared or received configuration files, they can be specified now by answering y. In this case, no GUI application needs to run during the installation, allowing for a shell-only installation.
For the default answer, the hostnames of the Cluster Nodes need to be specified (see below), and the cluster configuration is created automatically.
#* NOTE:
#+ No cluster configuration file (dishosts.conf) available.
#+ You can now specify the Cluster Nodes that are attached to the PCI
#+ Express network. The necessary configuration files can then
#+ be created based on this list of Cluster Nodes.
#+
#+ Please enter hostname or IP addresses of the Cluster Nodes one per line.
#* When done, enter a single full period ('.').
#+ (proposed hostname is given in [brackets])
# >>> Cluster Node hostname/IP address <full period '.' when done> []tiger-1
# >>> Cluster Node hostname/IP address <full period '.' when done> [tiger-2]
-> tiger-2
# >>> Cluster Node hostname/IP address <full period '.' when done> [tiger-3]
-> tiger-3
# >>> Cluster Node hostname/IP address <full period '.' when done> [tiger-4]
-> tiger-4
# >>> Cluster Node hostname/IP address <full period '.' when done> [tiger-5]
-> tiger-5
# >>> Cluster Node hostname/IP address <full period '.' when done> [tiger-6]
-> tiger-6
# >>> Cluster Node hostname/IP address <full period '.' when done> [tiger-7]
-> tiger-7
# >>> Cluster Node hostname/IP address <full period '.' when done> [tiger-8]
-> tiger-8
# >>> Cluster Node hostname/IP address <full period '.' when done> [tiger-9].
The hostnames or IP-addresses of all Cluster Nodes need to be entered. The installer suggests the hostnames if possible in brackets. To accept a suggestion, just press Enter. Otherwise, enter the hostname or IP address. The data entered is verified to represent an accessible hostname. If a Cluster Node has multiple IP addresses / hostnames, make sure you specify the one that is visible for the installation machine and the Cluster Management Node.
When all hostnames are entered, enter a single full period . to finish.
#* NOTE:
#+ The kernel modules need to be built on a machine with the same kernel
#* version and architecture of the interconnect Cluster Node. By default, the first
#* given interconnect Cluster Node is used for this. You can specify another build
#* machine now.
# >>> Build kernel modules on Cluster Node tiger-1 ? [Y/n]y
If you answer n at this point, you can enter the hostname of another machine on which the kernel modules are built. Make sure it matches the Cluster Nodes for CPU architecture and kernel version.
# >>> Can you access all machines (local and remote) via password-less ssh? [Y/n]y
The installer will later on verify if the password-less ssh access actually works. If you answer n, the installer will set up password-less ssh for you on all Cluster Nodes and the Cluster Management Node. You will need to enter the root password once for each Cluster Node and the password.
The password-less ssh access remain active after the installation. To disable it again, remove the file /root/.ssh/authorized_keys from all Cluster Nodes and the Cluster Management Node.
#* NOTE:
#+ It is recommnended that interconnect Cluster Nodes are rebooted after the
#+ initial driver installation to ensure that large memory allocations will succeed.
#+ You can omitt this reboot, or do it anytime later if necesary.
# >>> Reboot all interconnect Cluster Nodes
        (tiger-1 tiger-2 tiger-3 tiger-4 tiger-5 tiger-6 tiger-7 tiger-8)? [y/N]n
For optimal performance, the low-level driver needs to allocate some amount of kernel memory. This allocation can fail on a system that has been under load for a long time. If you are not installing on a live system, rebooting the Cluster Nodes is therefore offered here. You can perform the reboot manually later on to achieve the same effect.
If chosen, the reboot will be performed by the installer without interrupting the installation procedure.
#* NOTE:
#+ About to INSTALL Dolphin PCI Express interconnect drivers on these Cluster Nodes:
... tiger-1
... tiger-2
... tiger-3
... tiger-4
... tiger-5
... tiger-6
... tiger-7
... tiger-8
#+ About to BUILD Dolphin PCI Express interconnect drivers on this Cluster Node:
... tiger-1
#+ About to install management and control services on the Cluster Management Node machine:
... tiger-0
#* Installing to default target path /opt/DIS on all machines
.. (or the current installation path if this is an update installation).
# >>> OK to proceed? [Y/n]y
The installer presents an installation summary and asks for confirmation. If you answer n at this point, the installer will exit and the installation needs to be restarted.
#* NOTE:
#+ Testing ssh-access to all Cluster Nodes and gathering configuration.
#+
#+ If you are asked for a password, the ssh access to this Cluster Node without
#+ password is not working. In this case, you need to interrupt with CTRL-c
#+ and restart the script answering 'no' to the intial question about ssh.
... testing ssh to tiger-1
... testing ssh to tiger-2
... testing ssh to tiger-3
... testing ssh to tiger-4
... testing ssh to tiger-5
... testing ssh to tiger-6
... testing ssh to tiger-7
... testing ssh to tiger-8
#+ OK: ssh access is working
#+ OK: Cluster Nodes are homogenous
#* OK: found 1 interconnect fabric(s).

#* Testing ssh to other Cluster Nodes
... testing ssh to tiger-1
... testing ssh to tiger-0
... testing ssh to tiger-0
#* OK.
The ssh-access is tested, and some basic information is gathered from the Cluster Nodes to verify that the Cluster Nodes are homogeneous and equipped with at least one PCI Express adapter and meet the other requirements. If a required RPM package was missing, it would be indicated here with the option to install it (if yum can be used), or to fix the problem manually and retry.
If the test for homogeneous Cluster Nodes failed, please refer to section Section 2, “Installation of a Heterogeneous Cluster” for information on how to install the software stack.
#* Building Cluster Node RPM packages on tiger-1 in /tmp/tmp.AEgiO27908
#+ This will take some minutes...
#* Logfile is /tmp/DIS_install.log_983 on tiger-1

#* OK, Cluster Node RPMs have been built.

#* Building Cluster Management Node RPM packages on scimple in /tmp/tmp.dQdwS17511
#+ This will take some minutes...
#* Logfile is /tmp/DIS_install.log_607 on scimple

#* OK, Cluster Management Node RPMs have been built.

#* Copying RPMs that have been built:
/tmp/frontend_RPMS/Dolphin-NetworkAdmin-MX-5.5.0-1.x86_64.rpm
/tmp/frontend_RPMS/Dolphin-NetworkHosts-MX-5.5.0-1.x86_64.rpm
/tmp/frontend_RPMS/Dolphin-SISCI-MX-devel-5.5.0-1.x86_64.rpm
/tmp/frontend_RPMS/Dolphin-NetworkManager-MX-5.5.0-1.x86_64.rpm
/tmp/node_RPMS/Dolphin-SISCI-MX-5.5.0-1.x86_64.rpm
/tmp/node_RPMS/Dolphin-SISCI-MX-devel-5.5.0-1.x86_64.rpm
/tmp/node_RPMS/Dolphin-SuperSockets-MX-5.5.0-1.x86_64.rpm
/tmp/node_RPMS/Dolphin-MX-5.5.0-1.x86_64.rpm
The binary RPM packages matching the Cluster Nodes and Cluster Management Node are built and copied to the directory from where the installer was invoked. They are placed into the subdirectories node_RPMS and frontend_RPMS for later use (see the SIA option --use-rpms).
#* To install/update the Dolphin PCI Express services like SuperSockets, all running
#+ Dolphin PCI Express services needs to be stopped. This requires that all user
#+ applications using SuperSockets (if any) need to be stopped NOW.
# >>> Stop all Dolpin PCI Express services (SuperSockets) NOW? [Y/n]y

#* OK: all Dolphin PCI Express services (if any) stopped for upgrade.
On an initial installation, there will be no user applications using SuperSockets, so you can easily answer y right away.
#* Installing Cluster Node tiger-1
#* OK.
#* Installing Cluster Node tiger-2
#* OK.
#* Installing Cluster Node tiger-3
#* OK.
#* Installing Cluster Node tiger-4
#* OK.
#* Installing Cluster Node tiger-5
#* OK.
#* Installing Cluster Node tiger-6
#* OK.
#* Installing Cluster Node tiger-7
#* OK.
#* Installing Cluster Node tiger-8
#* OK.
#* Installing machine scimple as Cluster Management Node.
#* NOTE:
#+ You need to create the cluster configuration files 'dishosts.conf'
#+ and 'networkmanager.conf' using the graphical tool 'dis_netconfig' or dis_mkconf
#+ which will be launched now.


# >>> Are all cables connected, and do all LEDs on the Dolphin adapters light green? [Y/n]
The Cluster Nodes get installed and drivers and the node manager are started. Then, the basic packages are installed on the Cluster Management Node, and the dis_netconfig application is launched to create the required configuration files /etc/dis/dishosts.conf and /etc/dis/networkmanager.conf if they do not already exist. The script will wait at this point until the configuration files have been created with dis_netconfig, and until you confirm that all cables have been connected. This is described in the next section.
For typical problems at this point of the installation, please refer to Chapter 16, FAQ.
The Dolphin Network Configurator, dis_netconfig is a GUI tool that helps gathering the cluster configuration (and is used to create the cluster configuration file /etc/dis/dishosts.conf and the Network Manager configuration file /etc/dis/networkmanager.conf). A few global interconnect properties need to be set, and the position of each Cluster Node within the interconnect topology needs to be specified.
When dis_netconfig is launched, it first displays a dialog box where the global interconnect properties need to be specified (see Figure 4.1, “Cluster Edit dialog of dis_netconfig”).
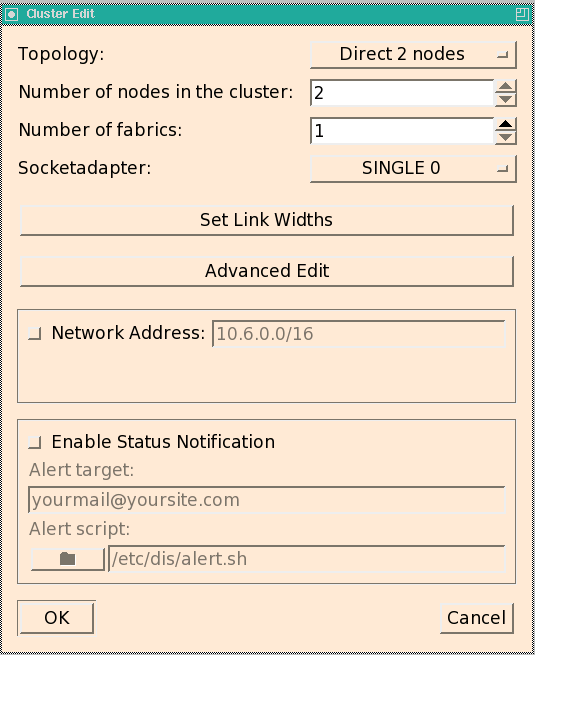
In the upper half of the Cluster Edit dialog, you need to specify the interconnect topology that you will be using with your cluster. If dis_netconfig is launched by the installation script, the script tries to set these values correctly, but you need to verify the settings.
Then, specify the Number of Cluster Nodes in your cluster.
The Number of fabrics needs to be set to the minimum number of adapters in every Cluster Node (typically, this value is 1).
The Socketadapter setting determines which of the available adapter is used for SuperSockets:
SINGLE 0: only adapter 0 is used
SINGLE 1: only adapter 1 is used (only valid for more than one fabric)
Channel Bonding: SuperSockets distributes the traffic across both adapters 0 and 1 (only valid for more than one fabric)
NONE: SuperSockets should not be used.
You then need to Set Link Widths for each Cluster Node. This can be set to x4, x8 or x16. The default is x8. The value must be set to x4 or x8 if a x4 or x8 cable is used, otherwise the low level driver will try to reset the link to establish a x8 or x16.
The Advanced Edit option does not need to be changed: the session between the Cluster Nodes should typically always be set up automatically.
If your cluster operates within its own subnet and you want all Cluster Nodes within this subnet to use SuperSockets (having PCI Express installed), you can simplify the configuration by specifying the address of this subnet in this dialog. To do so, activate the Network Address field and enter the cluster IP subnet address including the mask. I.e., if all your Cluster Node communicate via an IP interface with the address 192.168.4.*, you would enter 192.168.4.0/8 here.
SuperSockets will try to use the PCI Express for any Cluster Node in this subnet when it connects to another Cluster Node of this subnet. If using PCI Express is not possible, i.e. because one or both Cluster Nodes are only equipped with an Ethernet interface, SuperSockets will automatically fall back to Ethernet. Also, if a Cluster Node gets assigned a new IP address within this subnet, you don't need to change the SuperSockets configuration. Assigning more than one subnet to SuperSockets is also possible, but this type of configuration is not yet supported by dis_netconfig. See section Section 1.1, “dishosts.conf” on how to edit dishosts.conf accordingly.
This type of configuration is required if the same Cluster Node can be assigned varying IP addresses over time, as it is done for fail-over purposes where one machine takes over the identity of a machine that has failed. For standard setups where the assignment of IP addresses to Cluster Nodes is static, it is recommended to not use this type of configuration, but instead use the default static SuperSockets configuration type.
In case you want to be informed on any change of the interconnect status (i.e. an interconnect link was disabled due to errors, or a Cluster Node has gone down), active the check box Alert target and enter the alert target and the alert script to be executed. The default alert script is alert.sh and will send an e-mail to the address specified as alert target.
Other alert scripts can be created and used, which may require another type of alert target (i.e. a cell phone number to send an SMS). For more information on using status notification, please refer to Chapter 15, Advanced Topics,Section 1, “Notification on Interconnect Status Changes”.
In the next step, the main pane of the dis_netconfig will present the Cluster Nodes in the cluster arranged in the topology that was selected in the previous dialog. To change this topology and other general interconnect settings, you can always click in the Cluster Configuration area which will bring up the Cluster Edit dialog again.
If the font settings of your X server cause dis_netconfig to print unreadable characters, you can change the font size and the type with the drop-down box at the top of the windows, next to the floppy disk icon.
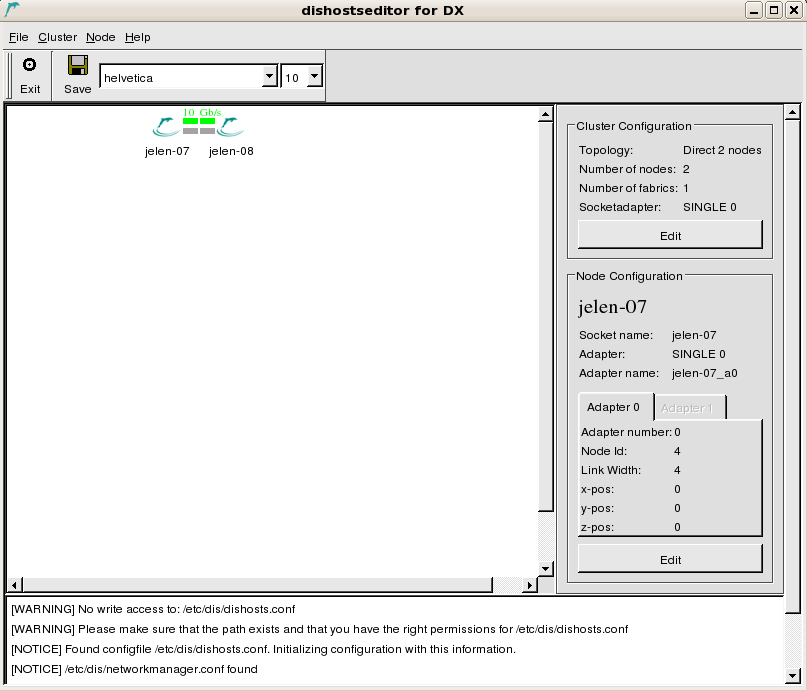

In the Node dialog you specify if you want to use 4, 8 or 16 PCI Express lanes. The value must be set to x4 if you are using a x4 to x8 transition cable or a x4 fiber cable.
The serial number field specifies which adapter will have its index unchanged in the adapters' array. If two cards are interchanged, or if one of the two is replaced, then the card with its serial number fully specified is guaranteed to have the same adapter number. Applications can continue to use the card based on its adapter number.
After you have assigned the correct hostname to this machine, you may need to configure SuperSockets on this Cluster Node. If you selected the Network Address in the cluster configuration dialog (see above), then SuperSockets will use this subnet address and will not allow for editing this property on the Cluster Nodes. Otherwise, you can choose between 3 different options for each of the currently supported 2 SuperSockets accelerated IP interfaces per Cluster Node:
- disable
Do not use SuperSockets. If you set this option for both fields, SuperSockets can not be used with this Cluster Node, although the related kernel modules will still be loaded.
- static
Enter the hostname or IP address for which SuperSockets should be used. This hostname or IP address will be statically assigned to this physical Cluster Node (its PCI Express interconnect adapter).
Choosing a static socket means that the mapping between the Cluster Node (its adapters) and the specified hostname/IP address is static and will be specified within the configuration file
dishosts.conf. All Cluster Nodes will use this identical file (which is automatically distributed from the Cluster Management Node to the Cluster Nodes by the Network Manager) to perform this mapping.This option works fine if the Cluster Nodes in your cluster don't change their IP addresses over time and is recommend as it does not incur any name resolution overhead.
- dynamic
Enter the hostname or IP address for which SuperSockets should be used. This hostname or IP address will be dynamically resolved to the PCI Express interconnect adapter that is installed in the machine with this hostname/IP address. SuperSockets will therefore resolve the mapping between adapters and hostnames/IP addresses dynamically. This incurs a certain initial overhead when the first connection between two Cluster Nodes is set up and in some other specific cases.
This option is similar to using a subnet (see Section 2.4.1.2, “SuperSockets Network Address”), but resolves only the explicitly specified IP addresses (for all Cluster Nodes) and not all possible IP addresses of a subnet. Use this option if Cluster Nodes change their IP addresses i.e. in a fail-over setup.
You should now generate the cabling instructions for your cluster. Please do this also when the cables are actually installed: you really want to verify if the actual cable setup matches the topology you just specified. To create the cabling instruction, choose the menu item -> . You can save and/or print the instructions. It is a good idea to print the instructions so you can take them with you to the cluster.
If the cables are already connected, please proceed with section Section 2.5.2, “Verifying the Cabling”.
Note
In order to achieve a trouble-free operation of your cluster, setting up the cables correctly is critical. Please take your time to perform this task properly.
The cables can be installed while Cluster Nodes are powered up.
The setup script will wait with a question for you to continue:
# >>> Are all cables connected, and are all Link LEDs on the Dolphin adapters green? [Y/n]
Please proceed by connecting the PCIe cables
Additional information can be found in the Users Guides for the interconnected products.
Important
A green link LED indicates that the link between the output plug and input plug could be established and synchronized. It does not assure that the cable is actually placed correctly! It is therefore important to verify once more that the cables are plugged according to the cabling instructions generated by the dis_netconfig!
If a pair of LEDs do not turn green, please perform the following steps:
Power-cycle the Cluster Nodes with the orange LEDs according to Chapter 16, FAQ,.
Contact contact Dolphin support, www.dolphinics.com, if you can not make the LEDs turn green after trying all proposed measures.
When you are done connecting the cables, all LEDs have turned green and you have verified the connections, you can answer "Yes" to the question "Are all cables connected, and are all Link LEDs on the adapters green? " and proceed with the next section to finalize the software installation.
Once the cables are connected, no more user interaction is required. Please confirm that all cables are connected and all LEDs are green, and the installation will proceed. The Network Manager will be started on the Cluster Management Node, configuring all cluster Cluster Nodes according to the configuration specified in dishosts.conf. After this, a number of tests are run on the cluster to verify that the interconnect was set up correctly and delivers the expected performance. You will see output like this:
#* NOTE: checking for cluster configuration to take effect:
... node tiger-1:
... node tiger-2:
... node tiger-3:
... node tiger-4:
... node tiger-5:
... node tiger-6:
... node tiger-7:
... node tiger-8:
#* OK.

#* Installing remaining Cluster Management Node packages

#* NOTE:
#+ To compile SISCI applications (like NMPI), the SISCI-devel RPM needs to be
#+ installed. It is located in the frontend_RPMS and node_RPMS directories.

#* OK.
If no problems are reported (like in the example above), you are done with the installation and can start to use your DolphinExpress accelerated cluster. Otherwise, refer to the next subsections and Section 2.8, “Interconnect Validation using the management GUI” or Section 2.9, “Interconnect Validation using the command line” to learn about the individual tests and how to fix problems reported by each test.
The Static Connectivity Test verifies that links are up and all Cluster Nodes can see each other via the interconnect. Success in this test means that all adapters have been configured correctly, and that the cables are inserted properly. It should report TEST RESULT: *PASSED* for all Cluster Nodes:
#* NOTE: Testing static interconnect connectivity between Cluster Nodes.
... node tiger-1:
TEST RESULT: *PASSED*
... node tiger-2:
TEST RESULT: *PASSED*
... node tiger-3:
TEST RESULT: *PASSED*
... node tiger-4:
TEST RESULT: *PASSED*
... node tiger-5:
TEST RESULT: *PASSED*
... node tiger-6:
TEST RESULT: *PASSED*
... node tiger-7:
TEST RESULT: *PASSED*
... node tiger-8:
TEST RESULT: *PASSED*
If this test reports errors or warning, you are offered to re-run dis_netconfig to validate and possibly fix the interconnect configuration. If the problems persist, you should let the installer continue and analyse the problems using dis_admin after the installation finishes (see Section 2.8, “Interconnect Validation using the management GUI”).
The SuperSockets Configuration Test verifies that all Cluster Nodes have the same valid SuperSockets configuration (as shown by /proc/net/af_ssocks/socket_maps).
#* NOTE: Verifying SuperSockets configuration on all Cluster Nodes.
#+ No SuperSocket configuration problems found.
Success in this test means that the SuperSockets service dis_supersockets is running and is configured identically on all Cluster Nodes. If a failure is reported, it means the interconnect configuration did not propagate correctly to this Cluster Node. You should check if the dis_nodemgr service is running on this Cluster Node. If not, start it, wait for a minute, and then configure SuperSockets by calling dis_ssocks_cfg.
The SuperSockets Performance Test runs a simple socket benchmark between two of the Cluster Nodes. The benchmark is run once via Ethernet and once via SuperSockets, and performance is reported for both cases.
#* NOTE:
#+ Verifying SuperSockets performance for tiger-2 (testing via tiger-1).
#+ Checking Ethernet performance
... single-byte latency: 56.63 us
#+ Checking Dolphin PCI Express SuperSockets performance
... single-byte latency: 0.99 us
... Latency rating: Very good. SuperSockets are working well.
#+ SuperSockets performance tests done.
The SuperSockets latency is rated based on our platform validation experience. If the rating indicates that SuperSockets are not performing as expected, or if it shows that a fall-back to Ethernet has occurred, please contact Dolphin Support. In this case, it is important that you supply the installation log (see above).
The installation finishes with the option to start the administration GUI tool dis_admin, a hint to use LD_PRELOAD to make use of SuperSockets and a pointer to the binary RPMs that have been used for the installation.
#* OK: Cluster installation completed.

#+ Remember to use LD_PRELOAD=libksupersockets.so for all applications that
#+ should use Dolphin PCI Express SuperSockets.
# >>> Do you want to start the GUI tool for interconnect adminstration (GUI admin)? [y/N]n

#* RPM packages that were used for installation are stored in
#+ /tmp/node_PRMS and /tmp/frontend_PRMS.
If for some reason the installation was not successful, you can easily and safely repeat it by simply invoking the SIA again. Please consider:
By default, existing RPM packages of the same or even more recent version will not be replaced. To enforce re-installation with the version provided by the SIA, you need to specify
--enforce.To avoid that the binary RPMs are built again, use the option
--use-rpmsor simply run the SIA in the same directory as before where it can find the RPMs in thenode_RPMSandfrontend_RPMSsubdirectories.To start an installation from scratch, you can run the SIA on each Cluster Node and the Cluster Management Node using the option
--wipeto remove all traces of the eXpressWare software stack and start again.
If you still fail to install the software successfully, refer to Chapter 7, Interconnect Maintenance.
Every installation attempt creates a differently named log file; it's name is printed at the very beginning of the installation.Please also include the configuration files that can be found in /etc/dis on the Cluster Management Node.
Dolphin provides a graphical tool named dis_admin. dis_admin serves as a tool to visually view the status and run diagnostics on your PCIe network. It shows an overview of the status of all adapters and links of a cluster and allows to perform detailed status queries. It also provides means to manually control the interconnect, inspect and set options and perform interconnect tests. For a complete description of dis_admin, please refer to Appendix B, dis_admin Reference. Here, we will only describe how to use dis_admin to verify the newly installed PCI Express network.
dis_admin will be installed on the Cluster Management Node machine by the SIA if this machine is capable to run X applications and has the Qt toolkit installed. If the Cluster Management Node does not have these capabilities, you can install it on any other machine that has these capabilities using SIA with the --install-frontend option, or use the Dolphin-NetworkAdmin RPM package from the frontend_RPMS directory (this RPM will only be there if it could be build for the Cluster Management Node).
It is also possible to download a binary version for Windows that runs without the need for extra compilation or installation.
You can use dis_admin on any machine that can connect to the Network Manager on the Cluster Management Node via a standard TCP/IP socket. You have to make sure that connections towards the Cluster Management Node using the ports 3444 (Network Manager) and 3443 (node manager) are possible (potentially firewall settings need to be changed).
dis_admin will be installed in the sbin directory of the installation path (default: /opt/DIS/sbin/). It will be within the dis_adminPATH after you login as root, but can also be run by non-root users.
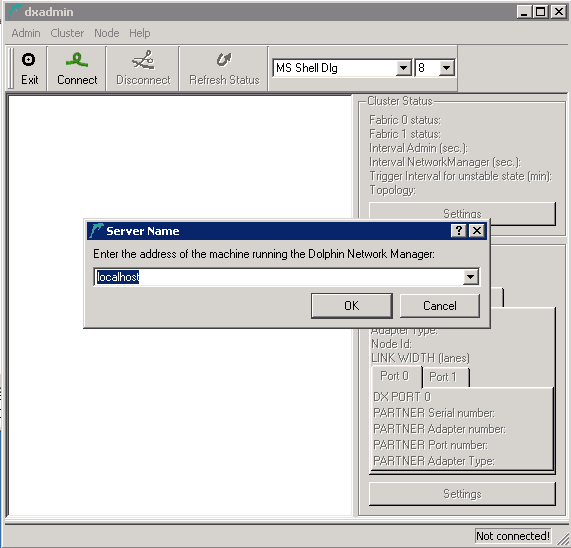
After it has been started, you will need to connect to the Network Manager controlling your cluster. Click the button in the tool bar and enter the appropriate hostname or IP address of the Network Manager.
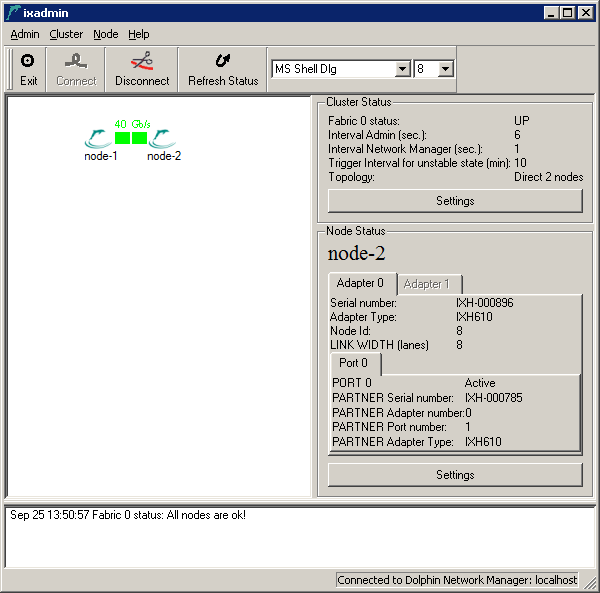
dis_admin will present you a graphical representation of the cluster Cluster Nodes and the interconnect links between them.
Normally, all Cluster Nodes and interconnect links should be shown green, meaning that their status is OK. This is a requirement for a correctly installed and configured cluster and you may proceed to Section 2.8.4, “PCIe connection Test”.
If a Cluster Node is plotted red, it means that the Network Manager can not connect to the node manager on this Cluster Node. To solve this problem:
Make sure that the Cluster Node is powered and has booted the operating system.
Verify that the node manager service is running:
On Red Hat:
# service dis_nodemgr status
On other Linux variants:
# /etc/init.d/dis_nodemgr status
The command
# svcs dis_nodemgr
should tell you that the node manager is running. If this is not the case:
Try to start the node manager:
On Red Hat:
# service dis_nodemgr start
On other Linux variants:
# /etc/init.d/dis_nodemgr start
If the node manager fails to start, please see /var/log/dis_nodemgr.log
Make sure that the service is configured to start in the correct runlevel (Dolphin installation makes sure this is the case).
On Red Hat:
# chkconfig --add 2345 dis_nodemgr on
On other Linux variants, please refer to the system documentation to determine the required steps.
dis_admin can validate that all PCIe connections are connected according to the configuration that was specified in the dis_netconfig, and which is now stored in /etc/dis/dishosts.conf on all Cluster Nodes and the Cluster Management Node. To perform the connection test, select . This test runs for only a few seconds and will verify that the Cluster Nodes are connected according to the configuration provided by the dis_netconfig.
Warning
Running this test may stop the normal traffic over the interconnect as the routing may be changed to fully test the network.
If you run this test while your cluster is in production, you might experience communication delays. SuperSockets in operation will fall back to Ethernet during this test, which leads to increased communication latency and lower throughput.
If the test detects a problem, it will inform you that Cluster Node A can not communicate with Cluster Node B. You will get more than one error message if the problem is caused by problem with a central switch etc.:
Try to fix the first reported problem by tracing the cable connections from Cluster Node A to Cluster Node B:
Verify that the cable connections:
Look up the path of cable connections between Cluster Node A and Cluster Node B in the Cabling Instructions that you created (or still can create at this point) using dis_netconfig.
When you arrive at Cluster Node B, do the same check for the path back from Cluster Node B to Cluster Node A.
Along the path, make sure:
That each cable plug is securely fitted into the socket of the adapter.
If you are using the multi port MXH830 adapter, verify each cable plug is connected to the right ports (1, 2, 3 or 4) as indicated by the cabling instructions.
If you can't find a problem for the first problem reported, verify the connections for all following pairs of Cluster Node reported bad.
After the first change, re-run the cable test to verify if this change solves all problems. If this is not the case, start over with this verification loop.
Dolphin provides a console tool named dis_admin_commandline. dis_admin_commandline shows an overview of the status of all nodes and links of a cluster and allows to perform a limited set of queries.
dis_admin_commandline will be installed on the Cluster Management Node by the SIA with the --install-frontend option, or use the Dolphin-NetworkAdmin RPM package from the frontend_RPMS directory.
Any command that is passed to dis_admin_commandline must be preceded by -cluster <frontend_machine_name> -fabric <adapter_number> . The full list of commands is printed when the program is started with no command line arguments.
Here are the most common commands used for inspection:
get-cluster-infoshows the cluster status and the topology dimensions.get-fabric-stateprints on one line the cluster status.application <name_of_application> <node1> <node2> <node...>runs one of the predefined applications on the specified Cluster Nodes. The supported applications are: alltoall, sciconntest, latency_bench, scipp, scibench2, dma_bench, intr_benchdis_admin_commandline-cluster node-3 -fabric 0 application sciconntest node-3 node-4 Feb 10 19:17:18 Started an application on node-3,node-4. Feb 10 19:17:18 This might take some time. Timeout is 55 seconds. [RESULT FROM RUNNING CMD ON SELECTED NODES] [node-3]: C:\Program Files\Dolphin Express\demo\sciconntest compiled Feb 10 2012 : 00:08:07 Response from remote node 8 ---------------------------- Local node-id : 4 Local adapter no. : 0 Segment size : 8192 MinSize : 4 Time to run (sec) : 10 Idelay : 0 No Write : 0 Loopdelay : 0 Delay : 0 Bad : 0 Check : 0 Mcheck : 0 Max nodes : 256 rnl : 1 Callbacks : Yes ---------------------------- Local segment (id=8, size=8192) is created. Local segment (id=8, size=8192) is shared. Connecting to 1 nodes Connect to remote segment, node 8 Remote segment on node 8 is connected. SCICONNTEST_REPORT NUM_TESTLOOPS_EXECUTED 155 NUM_NODES_FOUND 1 NUM_ERRORS_DETECTED 0 node 8 : Found node 8 : Number of failures : 0 node 8 : Longest failure : 0.00 (ms) SCICONNTEST_REPORT_END SCI_CB_DISCONNECT:Segment removed on the other node disconnecting..... The local segment is set to unavailable The local segment is removed [node-4]: C:\Program Files\Dolphin Express\demo\sciconntest compiled Feb 10 2012 : 00:08:07 Response from remote node 4 ---------------------------- Local node-id : 8 Local adapter no. : 0 Segment size : 8192 MinSize : 4 Time to run (sec) : 10 Idelay : 0 No Write : 0 Loopdelay : 0 Delay : 0 Bad : 0 Check : 0 Mcheck : 0 Max nodes : 256 rnl : 1 Callbacks : Yes ---------------------------- Local segment (id=4, size=8192) is created. Local segment (id=4, size=8192) is shared. Connecting to 1 nodes Connect to remote segment, node 4 Remote segment on node 4 is connected. SCICONNTEST_REPORT NUM_TESTLOOPS_EXECUTED 154 NUM_NODES_FOUND 1 NUM_ERRORS_DETECTED 0 node 4 : Found node 4 : Number of failures : 0 node 4 : Longest failure : 0.00 (ms) SCICONNTEST_REPORT_END The local segment is set to unavailable The local segment is removed SCI_CB_DISCONNECT:Segment removed on the other node disconnecting..... [DONE RUNNING CMD ON SELECTED NODES]get-interruptinforetrieves the interrupt counters on all Cluster Nodes.dis_admin_commandline -cluster node-3 -fabric 0 get-interruptinfo Feb 10 18:09:52 Started cmd get-interruptinfo on all nodes. node-3: No of total interrupt : 313 No of doorbell intterupts : 2 No of message interrupts : 61 No of switch events : 95 No of link up events : 28 No of link down events : 28 No of uncorrectable error events : 39 No of correctable error events : 0 No of unclaimed interrupts : 156 node-4: No of total interrupt : 118 No of doorbell intterupts : 1 No of message interrupts : 61 No of switch events : 56 No of link up events : 28 No of link down events : 28 No of uncorrectable error events : 0 No of correctable error events : 0 No of unclaimed interrupts : 0 Total correctable errors = 0, uncorrectable errors = 39
After the PCI Express hard- and software has been installed and tested, you can configure your cluster application to make use of the increased performance.
All applications that use generic BSD sockets for communication can be accelerated by SuperSockets without modifying the application binaries. For details, please refer to Section 2, “Make Generic Linux Applications use SuperSockets”.
SuperSockets can also be used to accelerate kernel services that communicate via the kernel socket API. This requires the kernel modules to be aware of the SuperSockets kernel service. For details, please refer to Section 6, “Kernel Socket Services”
The IPoPCIe driver can be used to accelerate any networked application or services. For details please refer to Section 1, “Who should use the TCP/IP driver”
Native SISCI applications use the SISCI API to use the PCI Express hardware features like transparent remote memory access, DMA transfers or remote interrupts. The SISCI library libsisci.so is installed on all Cluster Nodes by default. Any application that uses the SISCI API will be able use the PCI Express interconnect immediately when the network is configured and operational.
Note
The SISCI library can be compiled both as a 32-bit version and a 64-bit version on x86_64 Linux platforms.
To compile and link SISCI applications like the MPI-Implementation NMPI, the SISCI-devel RPM needs to be installed on the respective machine. This RPM is built during installation and placed in the node_RPMS and frontend_RPMS directory, respectively.